Random hints on printing, with concerns for legibility and durability:
note: instructions on pagination are coming shortly...
RAE's book is fairly long, but you can print it front and back on less than fifty pages,
permitting a staple or two.
If you want make something more book-like, read on. Below are some good links to get ideas.
The method that I and RAE have used borrows heavily from the technique described in the tomstrong
link.
http://papa.essortment.com/howtobindabo_rjox.htm
http://www.tomstrong.org/public/misc/bookbinding.intro.txt
Now, however you want to bind a copy, the five booklet-formatted PDFs should be extremely useful. In
each of these files, the pages are arranged so that, when eight sheets are folded together down
their center (like a booklet), the pages read in the correct order. [email me if you lost the ascii
file with the pagination sequences for this]
You can try stapling the booklets together individually and then tying them somehow together, or
cutting off the creases and using a PVA glue, or, like we have done, sew them to a cover. For our
technique, keep reading.
0) overview
There are five PDF files arranged to print as eight-sheet booklets (each with 32 pages), and there
will correspondingly be five booklets to sew together after printing. This process is outlined
below, but keep in mind that instructions, like rhubarb cake recipes, only taste good if modified.
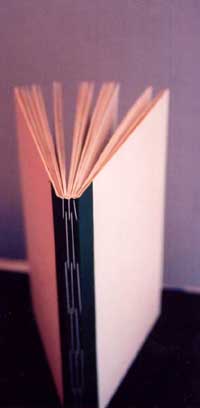
The book will be about 8.5 in. tall and 5.5 in. wide. This is the dimension of a letter-size sheet
folded in half. We have found it most successful to sew with thick thread the five booklets into
a mat board cover. This cover provides the book's protection, and forms the front cover, spine
and back cover by bending. The pages are sewn into the spine, which is about 0.5 in wide. There
are predrilled or prepunched holes in the spine, and corresponding holes through the creases of
the booklets to permit a needle and thread. One piece of thread sews all of the booklets into the
spine.
1) booklets
There are sixteen pages in each PDF file. These should be printed front and back onto eight sheets.
The order may seem odd, but after folding the stack of eight in half, you will be pleasantly amused.
Print all five files like this, so that you will have 5X8=40 sheets altogether. Note that this is
a 160 page book (four pages per sheet). Stack the folded booklets so that the creased align and
clamp overnight to set the crease. this will help you fit the booklets into the binding when
sewing.
2) cover/binding
Choose a study paper product for the binding/cover. Chip or mat board, about 1/16 in. thick is
good. Cut the board into rectangles that will be folded to make the spine and front/back cover.
The height of the rectangle should be 8.5 in, corresponding to the booklet height. The length
should be 5.5X2=11 in. for the front and back cover, plus 3/8 in. for the spine. The spine is
about 3/8 in. because each booklet should be about 1/16 in after clamping. Draw vertical lines
(8.5 in. long) on the inside of the spine where the booklets will go. Start with a line in the
center of the rectangle for the central booklet. Draw two parallel lines on each side of the
central line for the other four booklets. All lines should be space 1/16 in. Now, to facilitate
the bending of the cover/binding, compress on the inside a line that is 1/16 in away from the two
outermost booklets. In the same location on the front of the binding/cover, lightly score the same
line. This will help the fiber tear and compress on the fold. It is a good
idea to protect the scored outside of the book with a heavy tape, like bookbinding tape or duct
tape. It will look nice too, so choose a pretty color. Now you should have
a rectangular piece of board that is separated by two folds into three smaller rectangles, two are
5.5x8.5 in. for the covers, and one is 3.8x8.5 in for the spine. You still need to make
holes in the spine of the book for the sewing process. See below.
3) holes in booklets and spine
I suggest that you space the holes for sewing one and a half inch. That will leave 1/2 in. spaces
at either end (5 X 1.5 in = 7.5 in; 7.5 + 2 X 0.5 = 8.5 = total binding length). Open the first
booklet to the centerfold and mark the hole locations. A jig here is a good idea, since you will
mark the same holes ten times. After marking, drill with 1/16 in bit or punch with a nail the six
holes. You might use butterfly clips or weights to hold together the eight booklet sheets during
this process, as that will facilitate an accurate transmission of hole location. Put the six holes
in all five booklets. Now, put the holes on each of the five lines of the inner spine. These are
the lines described in the binding/cover section. As you've guessed, the rows of holes in the
booklets should align with the holes in the five rows of the spine. To get a prettier result, and
also get yourself more space for making holes, offset every other hole either up or down 1/8 in.
This can get a little complex, especi ally for a first run, but the result is nice.
To be clear, measuring from the top of the spine, the first booklet can have holes at
5/8, 1 7/8, 3 5/8, 4 7/8, 6 5/8, 7 7/8 inches (six holes). Notice each measurement is
alternately below and above the standard 1.5 in spacing. The next row would alternate:
3/8, 2 1/8, 3 3/8, etc. You will need to make the holes in the booklets correspond to the
alternating pattern, if you decide to do it.
 4) sew
The steps of sewing are tying the start knot, sewing in all the booklets, tightening the thread, and
tying the end knot. The end knot is the hardest part here, but also the grand finale. Choose a
thread that is serious: go to a hobby store and get some nylon stuff that you're not afraid to
pull on. You should not be able to break the thread with human effort. Use a big sewing needle,
if you can get the thread to fit the eye. Otherwise, I have no idea. To start, put the needle
through the top hole in the first booklet from the centerfold side. Now put the needle through
the top hole on the first line on the inside of the spine. Bring the needle over the top of the
spine and tie a real good tight not to attach the top of the first booklet. Now you're ready to
go through the second hole from the centerfold side of the booklet. I realize that this might be
unclear, but if you're intuition doesn't help you out, go to the tomstrong website, where there are
more threading instructions than I could read. But anyway, keep going until you have finished the
first booklet (I think the thread will be coming out of the cover on the last hole - not out of the
centerfold), then go around the spine and into the bottom hole of the second booklet from the
centerfold side. From here you should have it figured out. When you get to
the end of a booklet and the thread is coming out of the centerfold, go around the end of the spine
and through the first hole of the next booklet, so that the thread will be coming out of the
centerfold of the new booklet. But that's probably intuitive. Don't worry
too much about keeping it tight. You will need to tighten the whole thing when you get
done. From the outside of the spine, just start at the start knot and pull the loops
(make sure the booklets are against the inner spine so that you don't rip the thread through the
eight sheets). When you get to the end, use do your best to make another knot. The
configuration will be the same as the start knot, but you will probably need to use the needle to
get under the last loop in the bottom of the last centerfold, since you just pulled everything tight.
Ask someone who's sewn clothes before if you are worried that it won't hold. Or if you are using
nylon, you could try using an iron to carefully melt the end of the thread (if you burn through,
you'll have to start over).
5) optional
It will make it easier to turn the pages if you somehow cut or sand the long free end of the pages.
To do this best, you'll probably want to clamp to pieces of wood or something just at the point you
want to cut or sand down to. If you have a random orbital sander, this is definitely the way to go.
It will work by hand also; just use a circular or figure-8 motion. with a sanding block. Sanding
the other edges will endanger the thread. If you foresee yourself doing this last step, leave the
cover/binding a bit long to allow it to be sanded to the same length as the pages. Please remember
that making books is a sort of funny thing to do, and that the most I can hope is that these mundane
instructions are some sort of food for a better idea... a better kind of book. Check textz.com.


|
Text and photos are copyright 2002, 2003 by RAE. Redistribution of text is allowed, but not
for commercial purposes.
|
Site design by Jason Ronbeck
|
|
E-mail
rae@thecompany.net
|